Tag Archives: skull

nailed it: Zombody to love

22 Apr

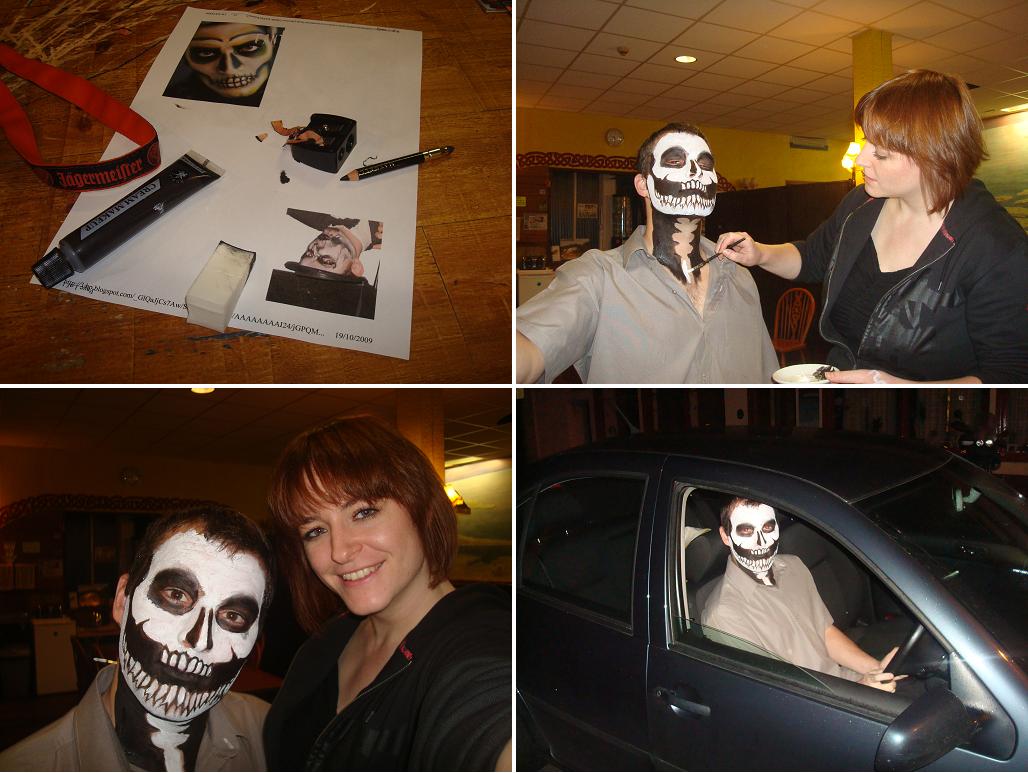
Wordplay stolen from Carissa.

Image

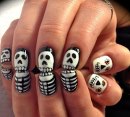
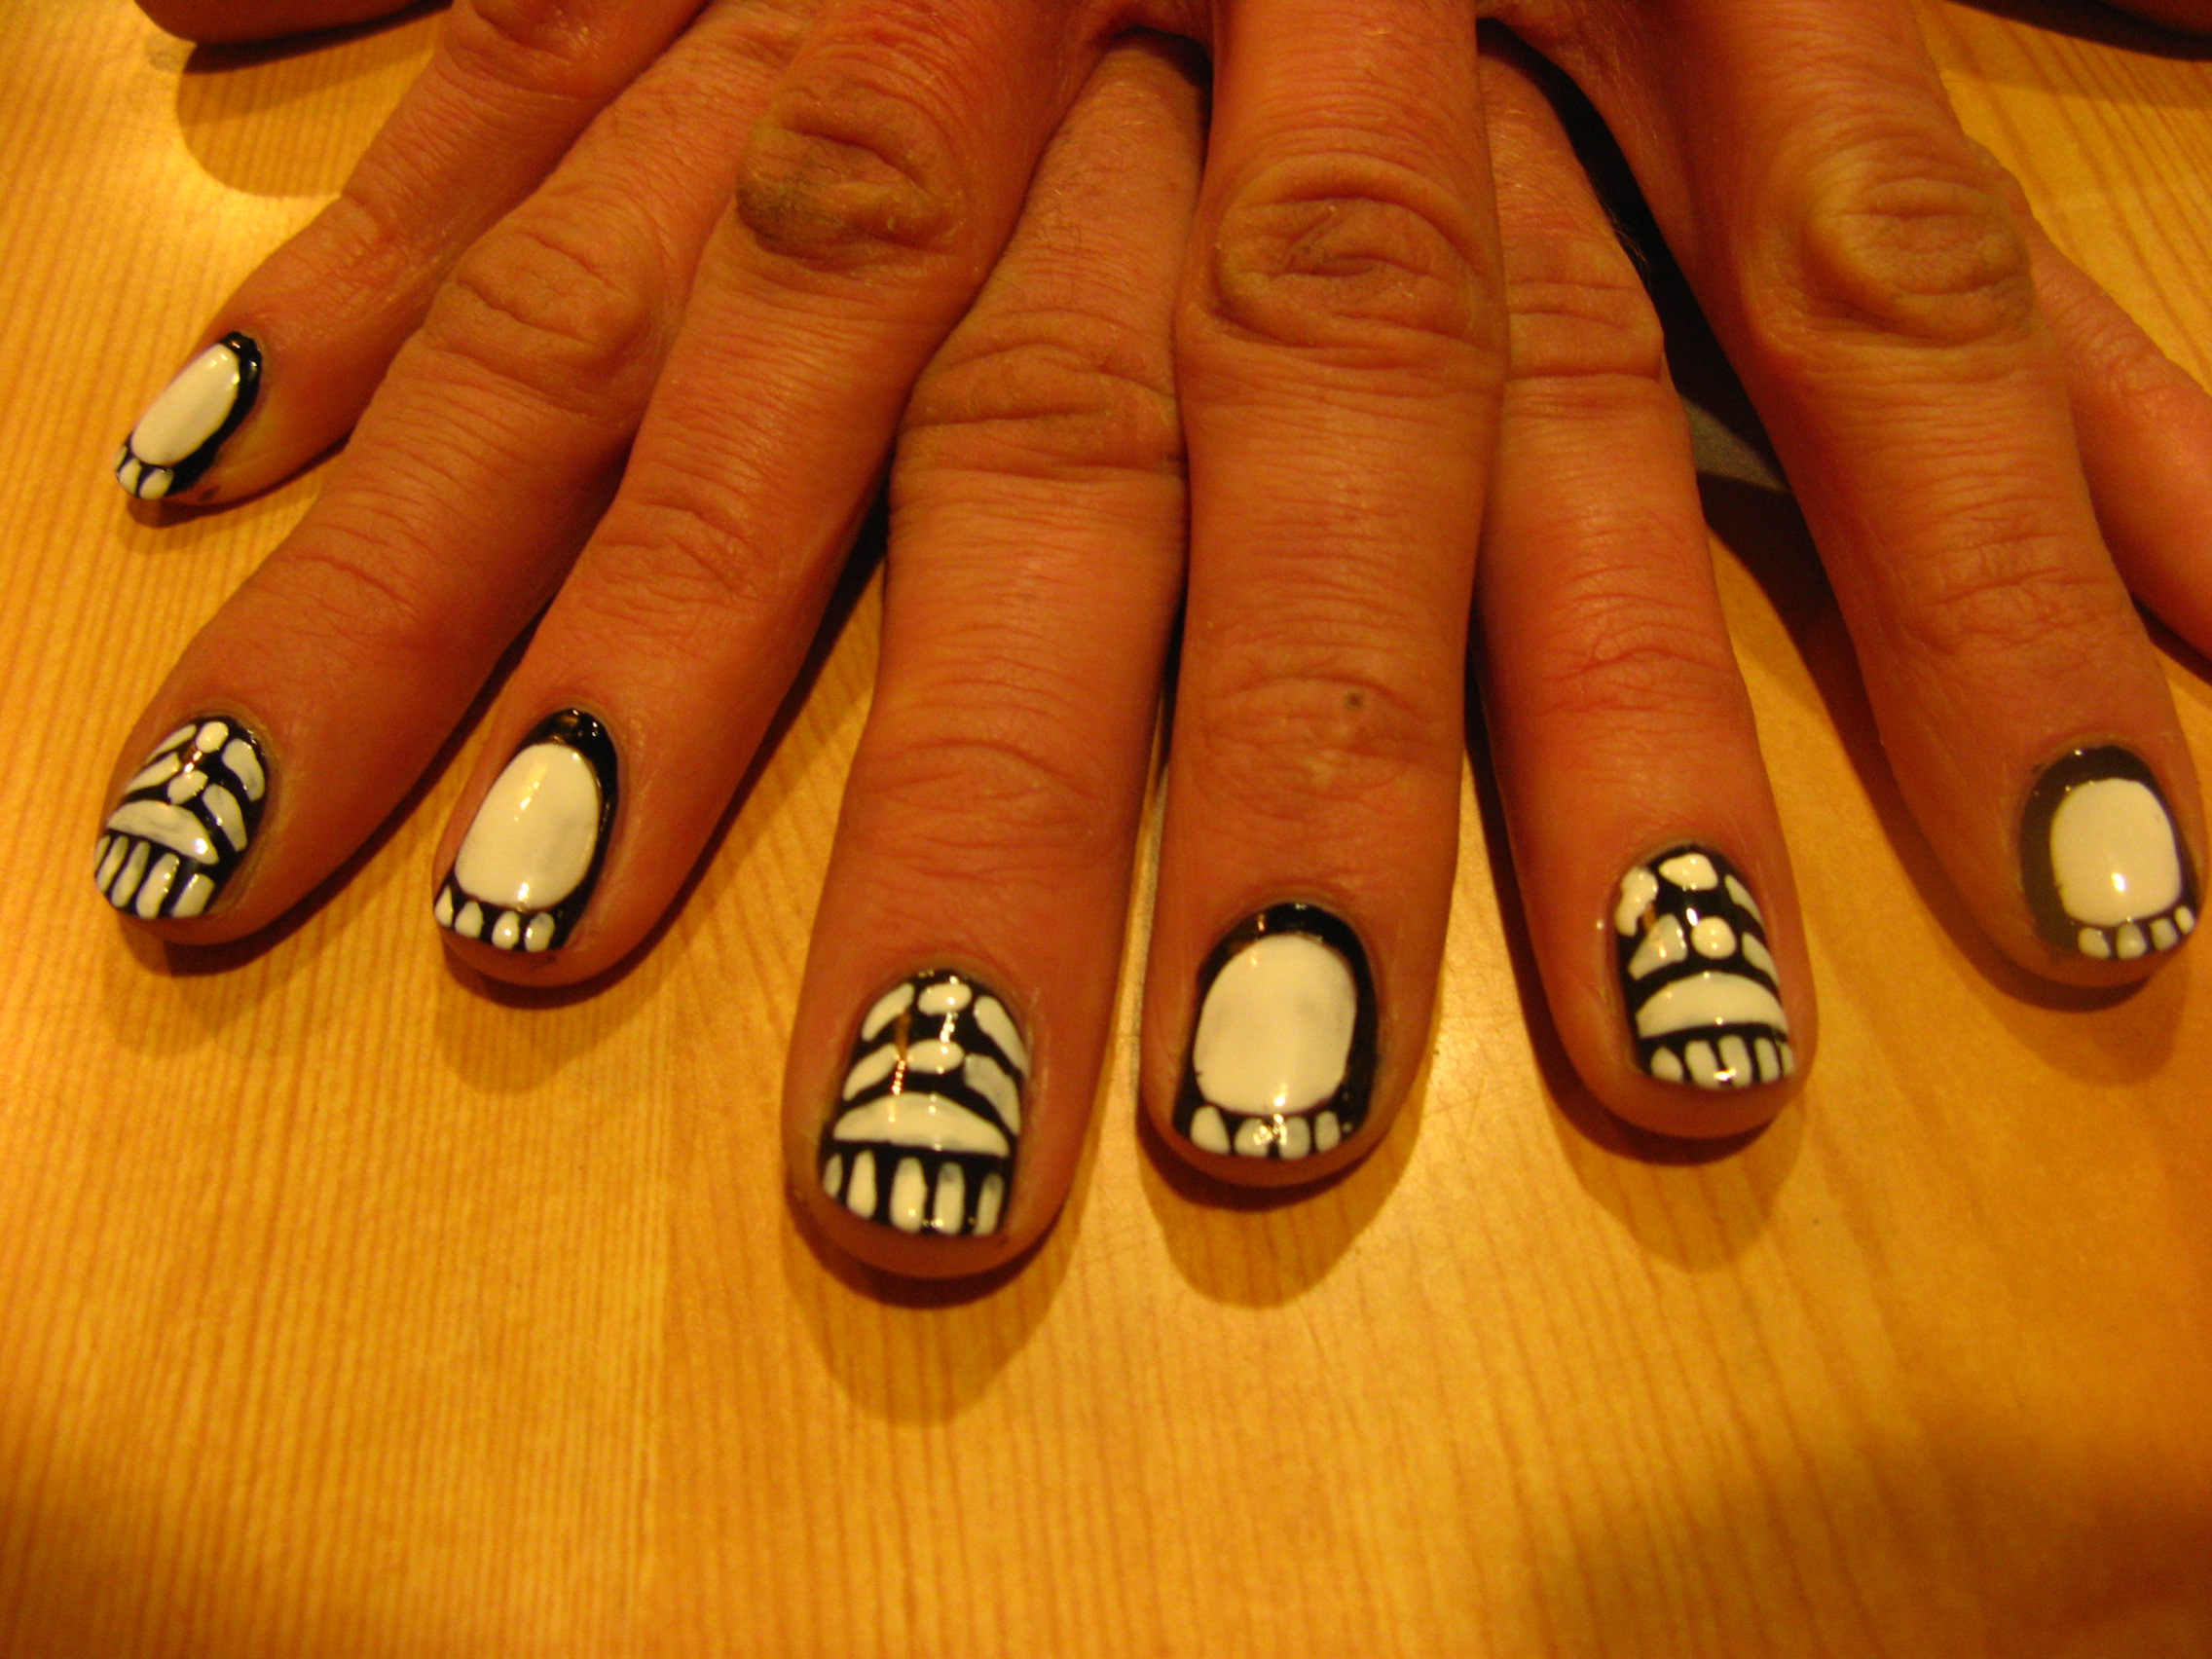
Iron Fist ‘zombie stomper’ nail transfers

These Iron Fist bad-boys came in a neat lil packet with a nail file and wooden stick to poke your cuticles with.

Image

I’ve used lots of different brands of nail transfers, and I have to say (having only worn these so far for a few hours) that I’m pretty impressed.

Image

The instructions recommend buffing your nails and applying the transfers to a clean surface, but I also suggest putting on a base coat, whatever you would normally put on your nails if you are so inclined.  For a while I have been using Sally Hansen Miracle Cure Problem Nail Strengthener.

I recommend this for two reasons; partly to give the sticker something to grip, but mostly to protect your natural nail.  So when you peel it off, it doesn’t take bits of your own nail with it.  Stickers are dark horses; wearing them back-to-back for several weeks last summer, I found myself with soft flaky nails, good for nothing.

I suggest putting on a base coat, letting it dry, then applying your transfers.

Image

All nail stickers are usually designed for long-ish nails; you need to have some length to be able to wrap the transfer over, to file it off.  And the designs are usually for longer nails – some of the zombie eyeballs were kind of cut off, even on my nails which I would say are pretty long right now.

Speaking of.  You might have also noticed that some of my nails are revoltingly long and pointy; this is a nail-shape that seems to work well for me, as in, it resists chips and splits etc, and I can grow my nails disgustingly long if I file them in to a point while I do it.  Also makes me feel like Cat Woman.

Anyway.  These nail stickers went on really well; they are a lot softer and more pliable than many other brands I have used, so they were very easy to stretch-to-fit onto my nails, and being so pliable, fit really easily.  I screwed up on two of my nails and to be honest those two are already (a few hours after applying them) showing signs of poor resilience.

Compared to other brands (including Nail Rock) that have been somewhat more brittle, it looks like these will wear well.  I’ll update this post to let you know for sure.  Other brands I’ve used have been more difficult to apply completely smoothly, and that seems to be the trouble with any nail sticker; as soon as it’s not perfectly applied, any wrinkles will quickly turn into peeling and lifting.  Makes sense I guess.

Anyway – this post is scheduled to go live on Monday, when I will be heading back home to Oban from Glasgow.  I was there to see Jettblack, so it’s possible that by the time you are reading this, I will have run off with Jon Dow and you won’t hear from me again.  If that is the case I’ll give Chloe my flog password so she can let you all down gently.

Do you think he likes zombie nails?  I hope he likes zombie nails.  Screeeeam!

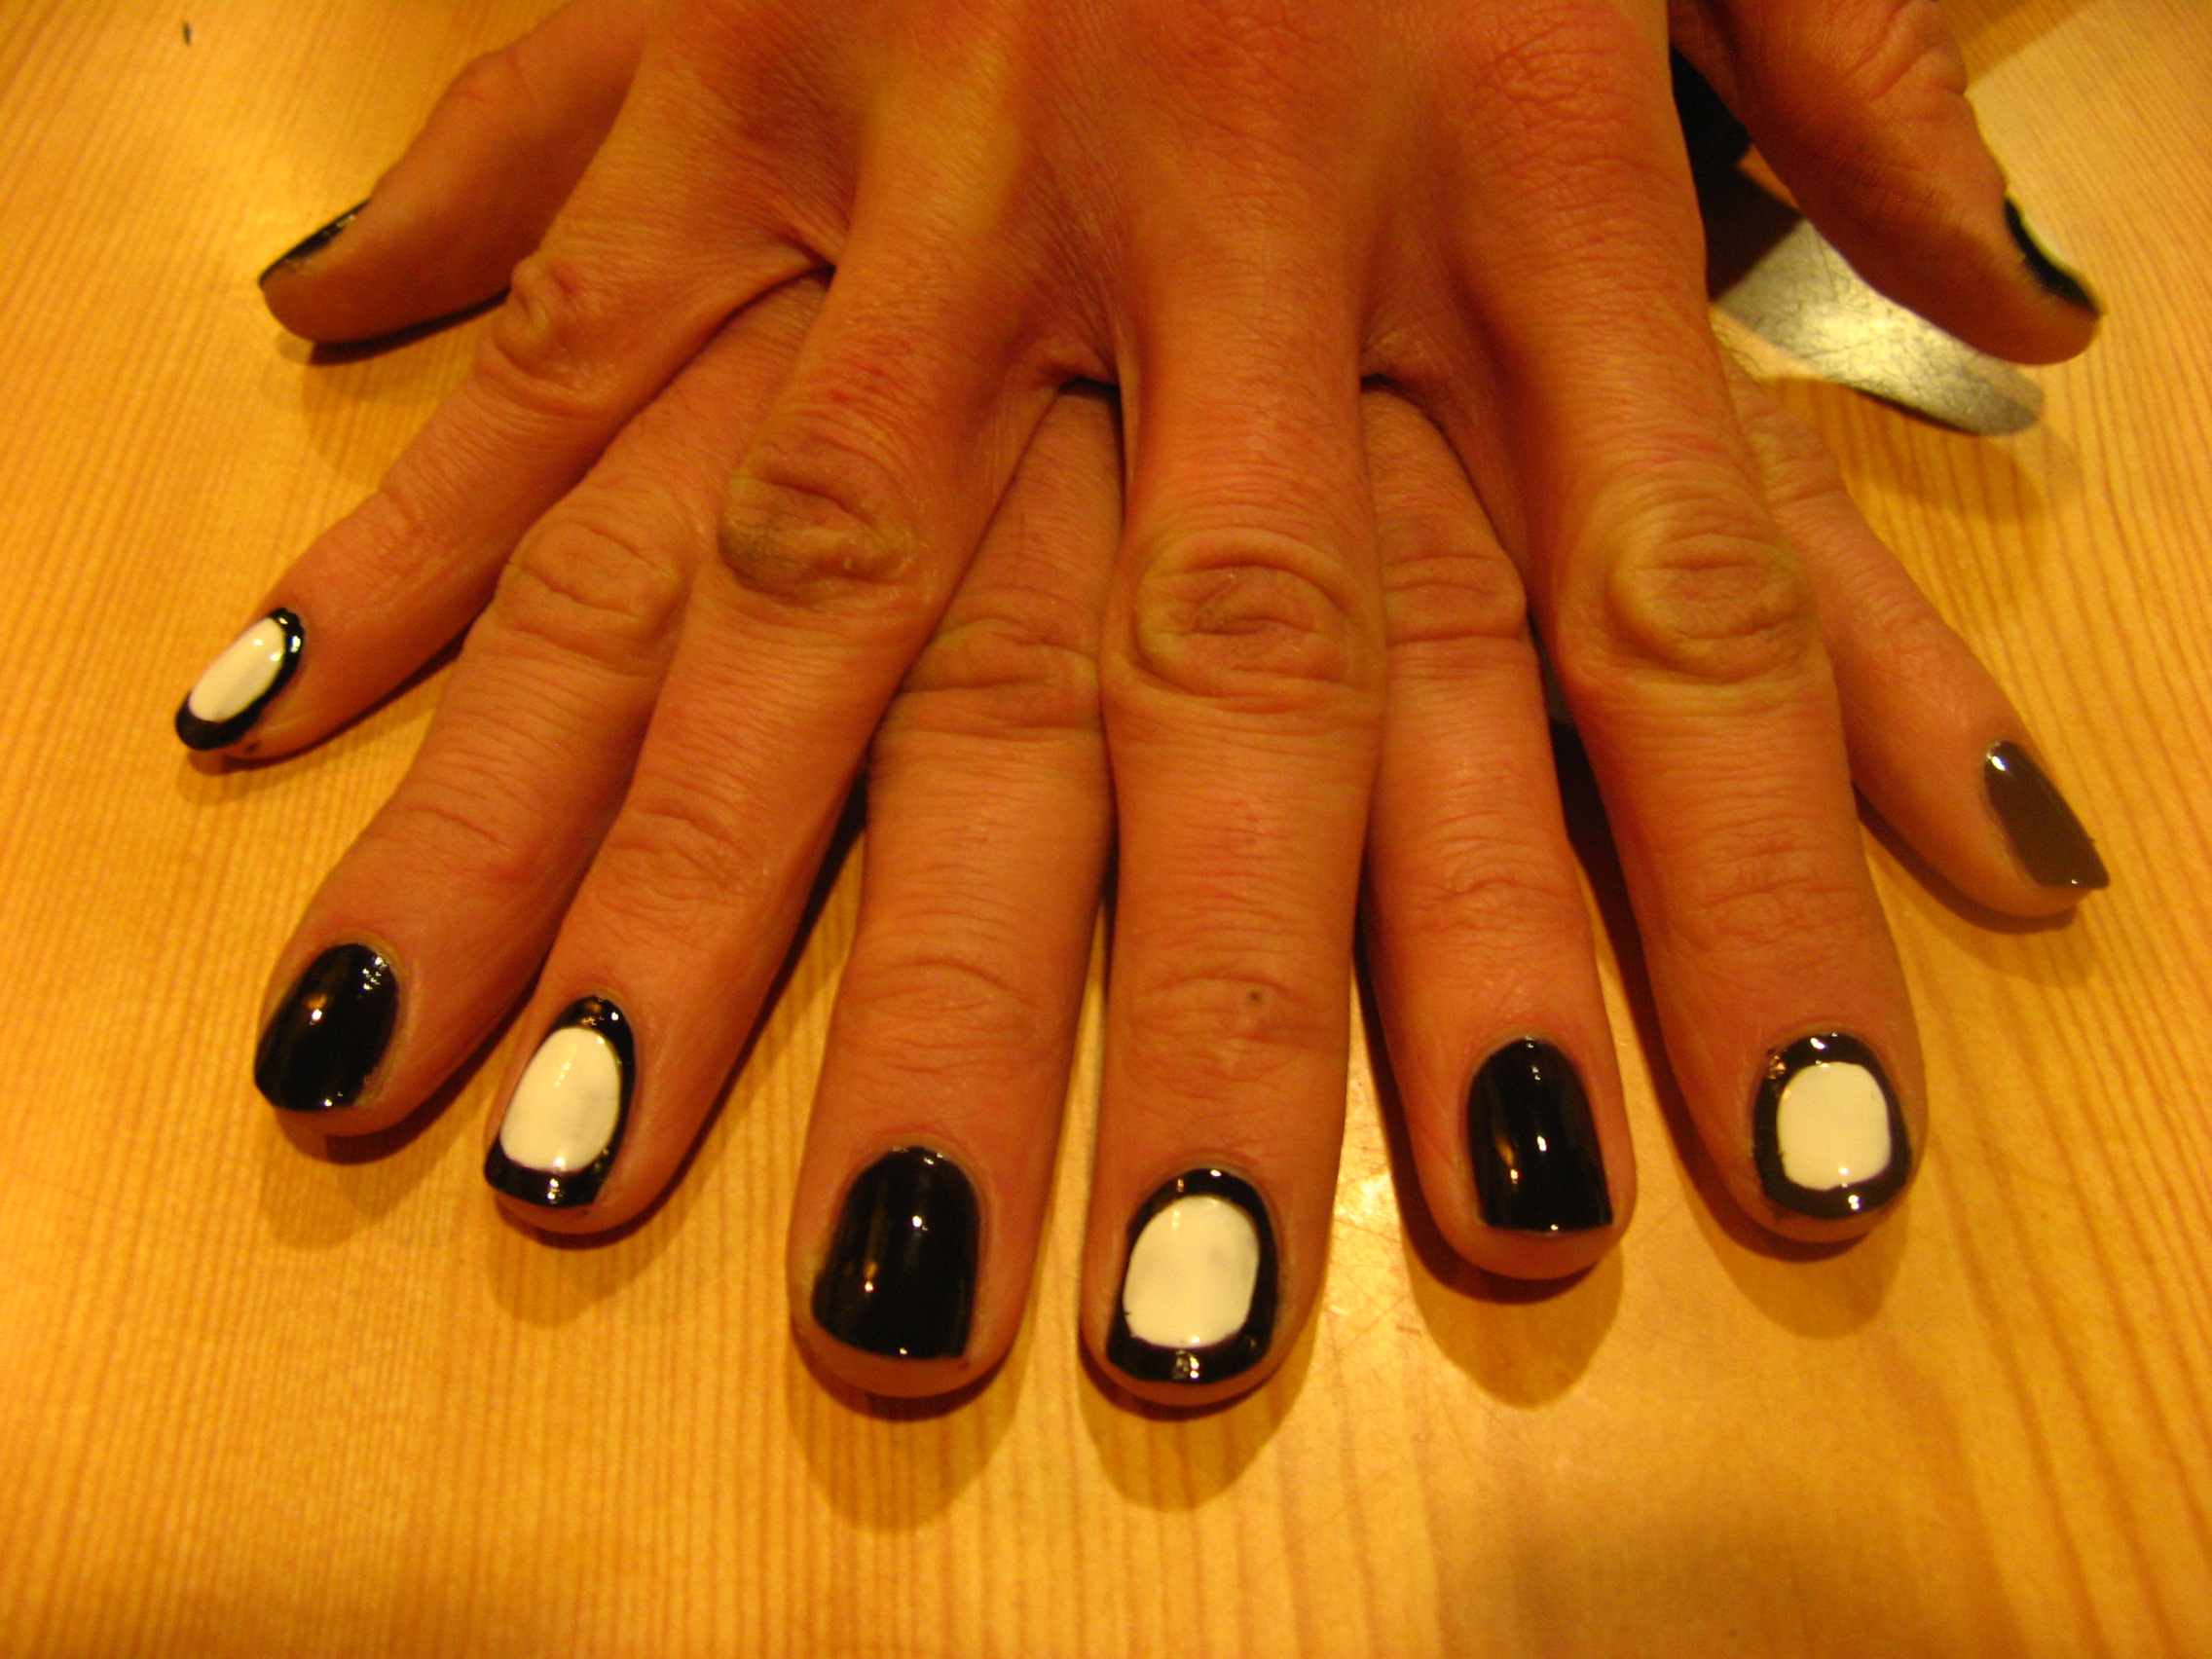
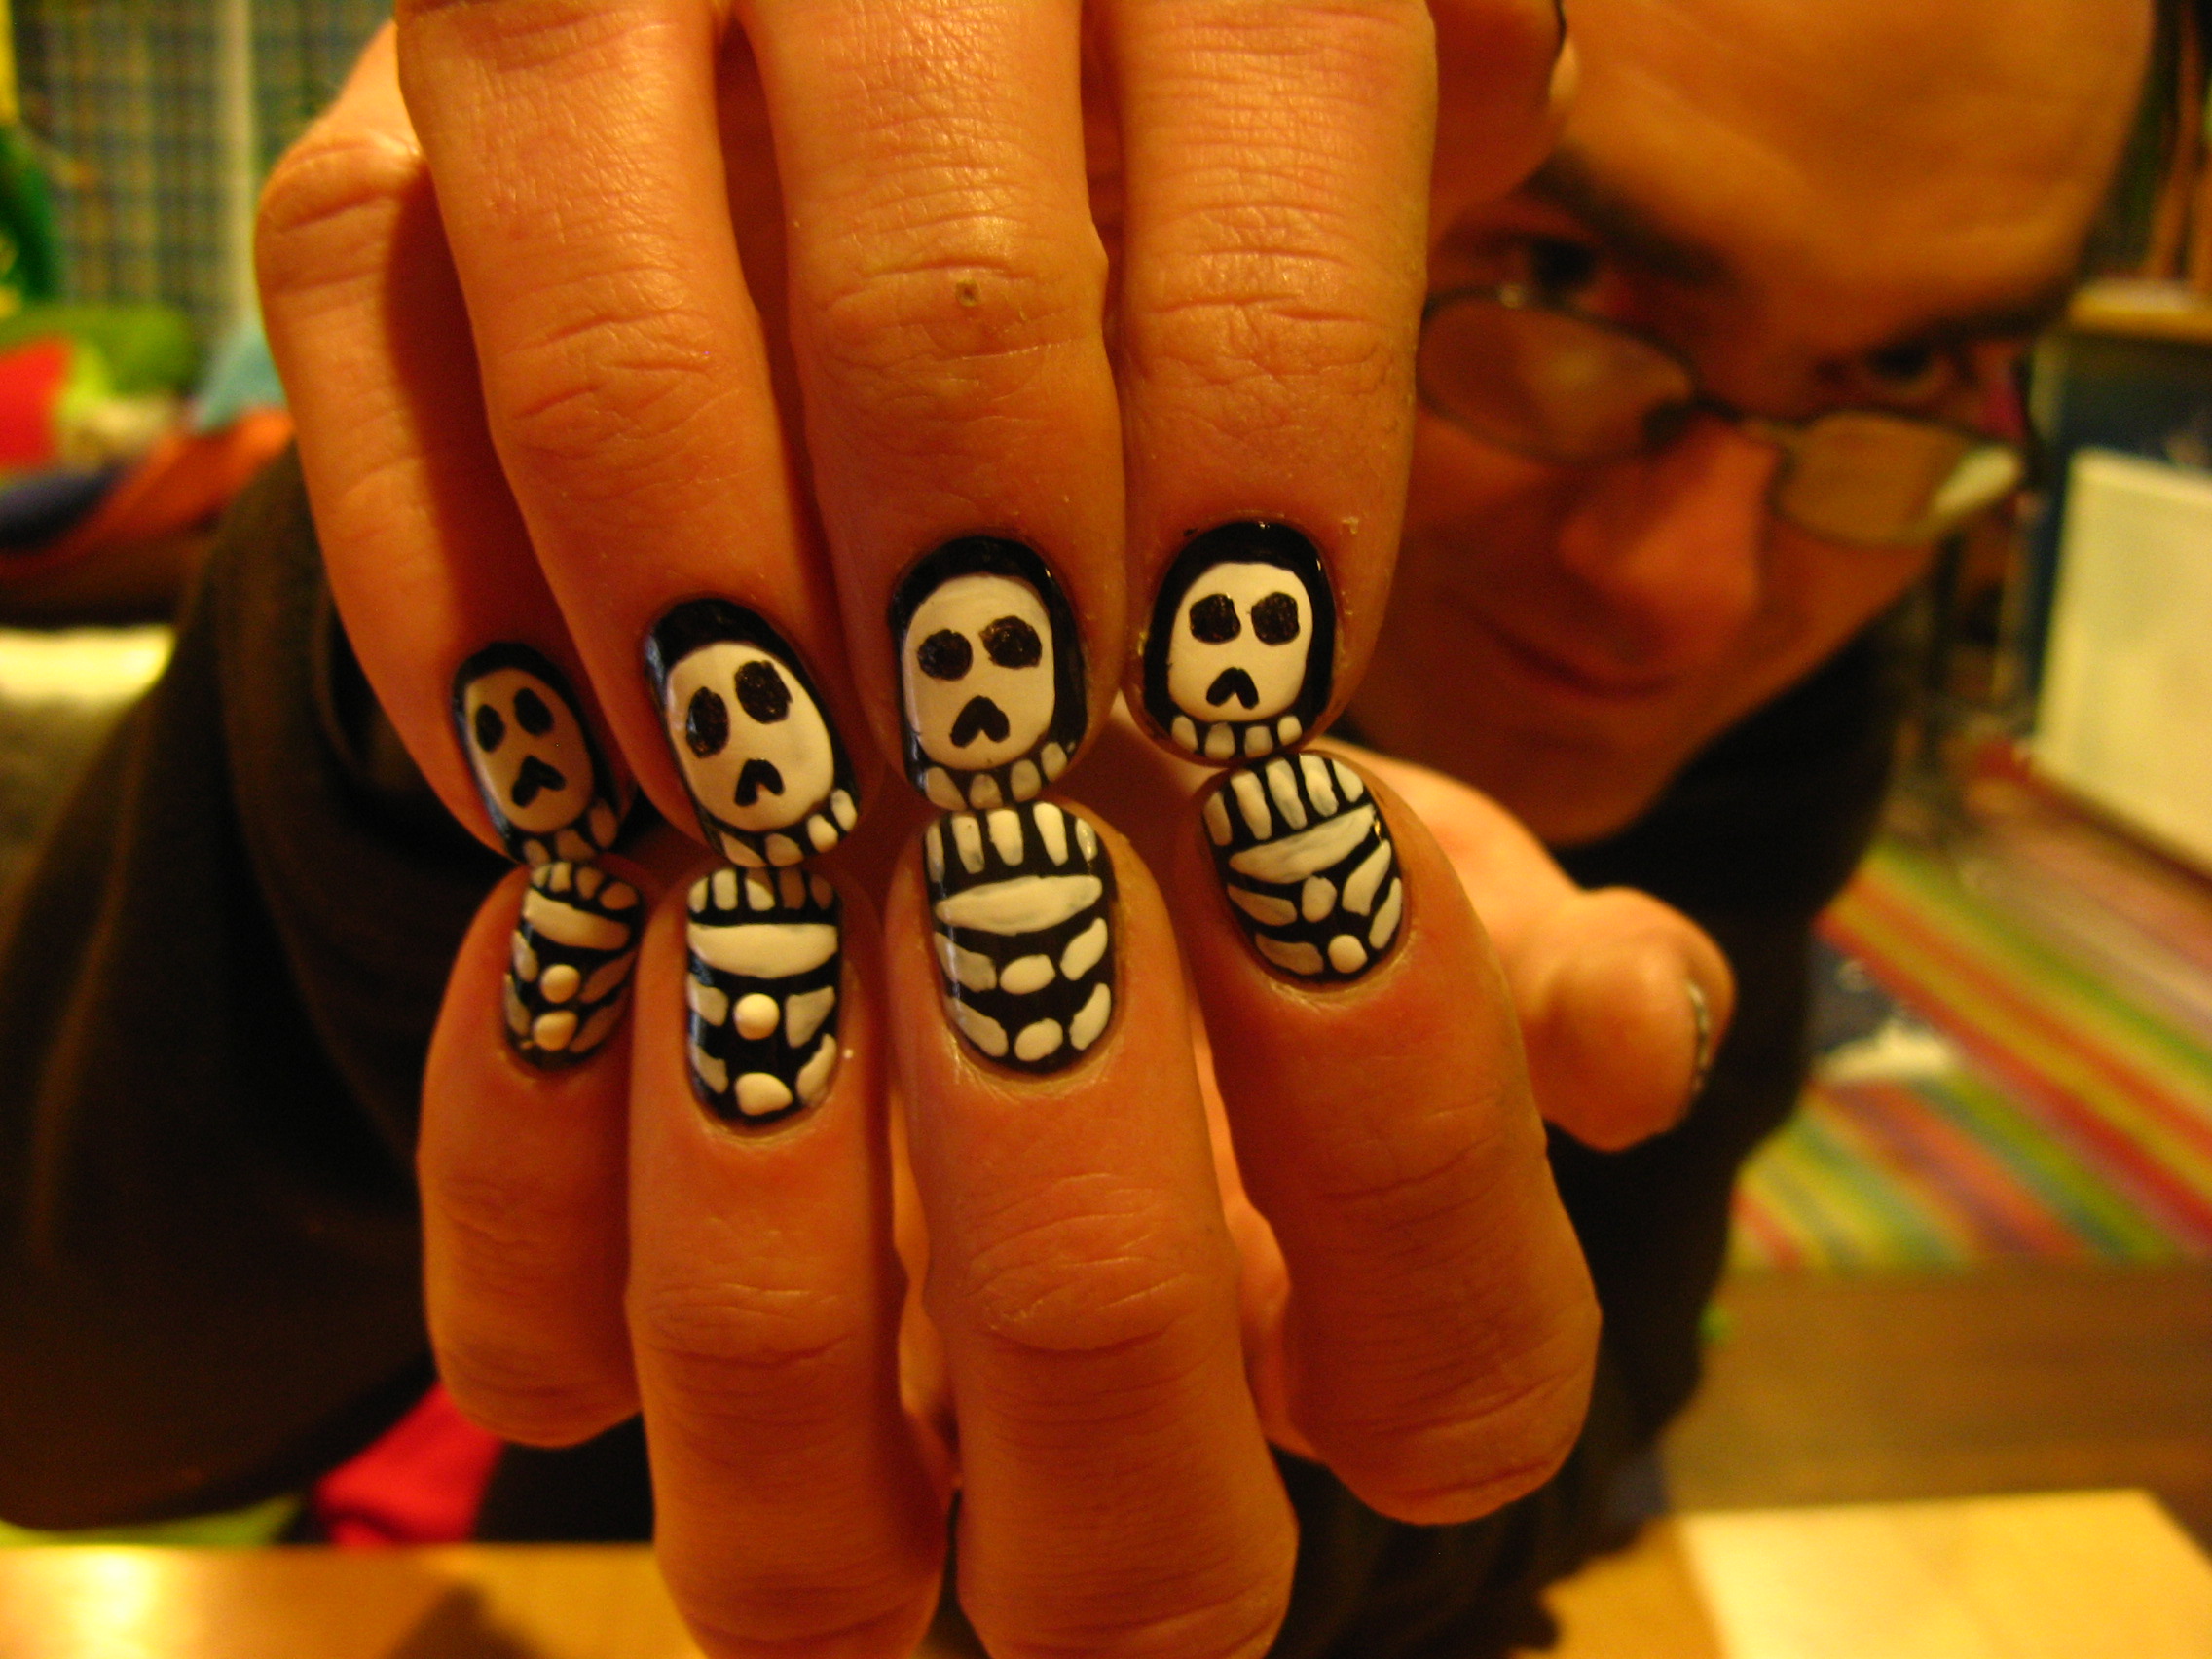
Update: this is what they look like after 48 hours wear.

DSC05536

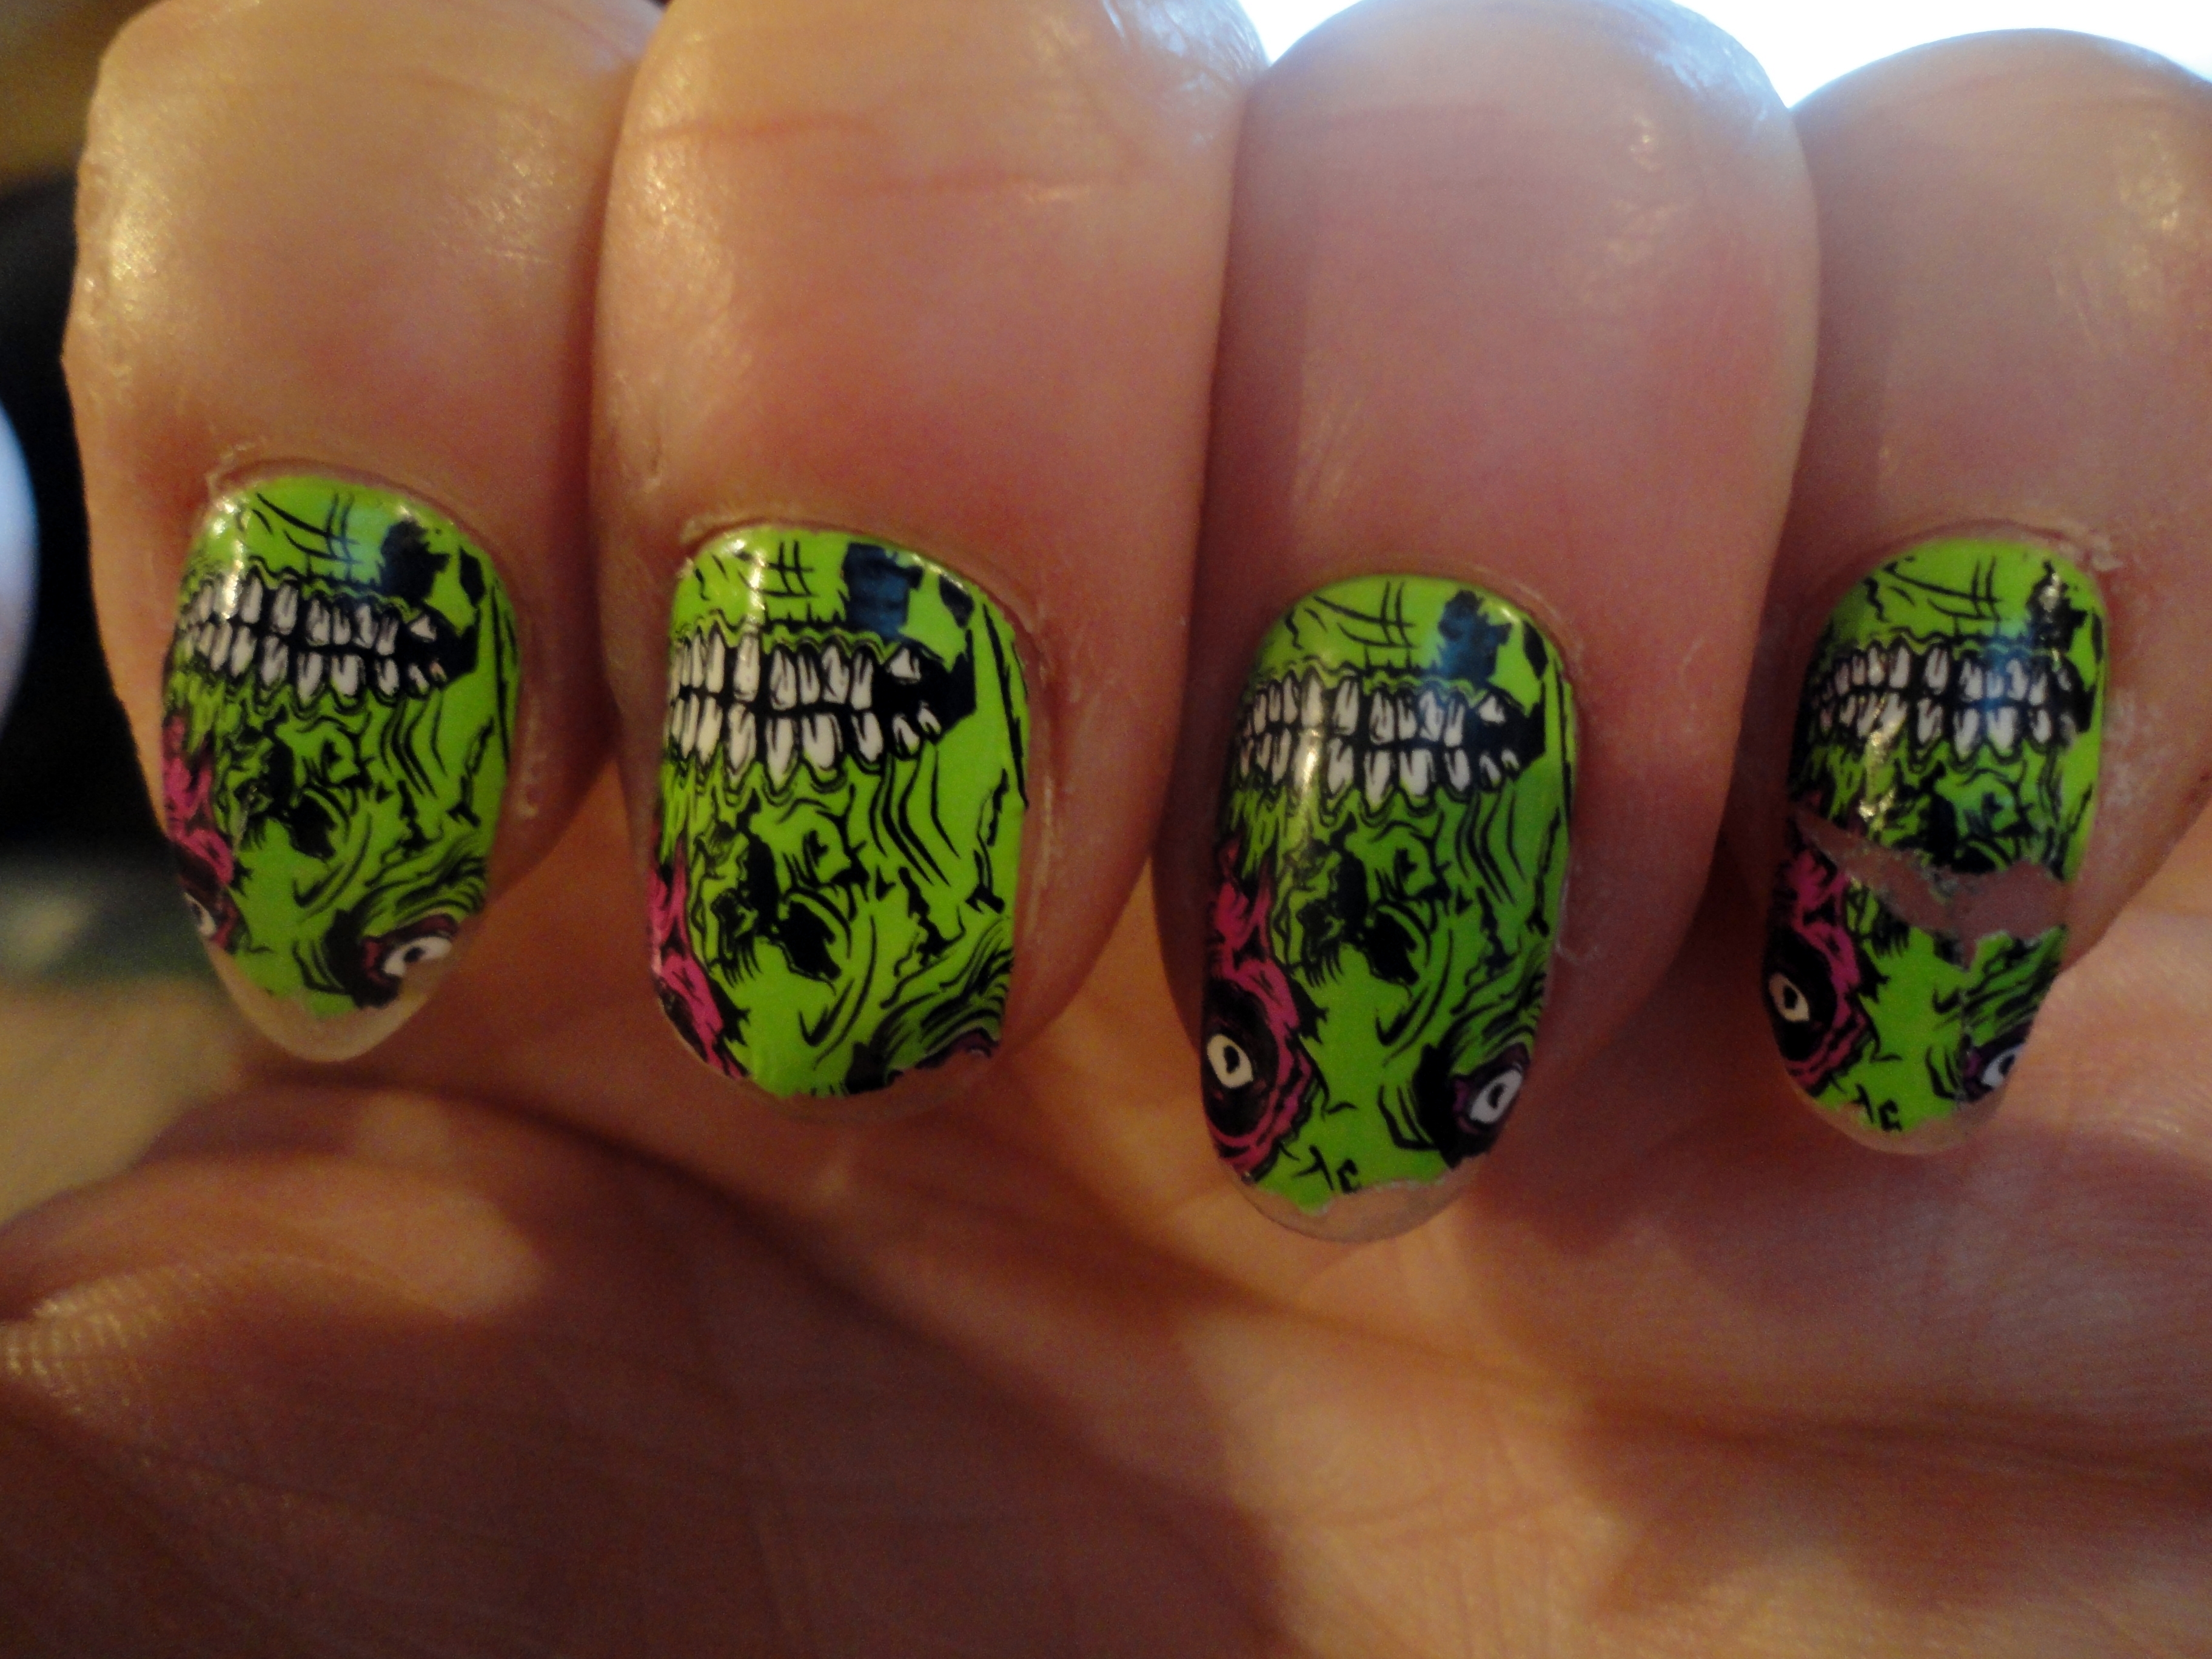
The index and pinky finger are the worst; these are the two that I screwed up putting on.  The pinky is ripped in the middle and the index finger just has quite a big chunk missing from the tip.  As the pattern is so busy it’s not actually that noticeable in real life.

The rest of the nails have worn a little on the tips but not too much.  None of them have peeled or lifted, so, they remain the best-wearing nail stickers I have used – hands down!

Grant’s skull nails (freehand)

7 Feb

So, this was what I was trying to do.

skull nails

My handsome, hilarious, charismatic friend Canadian Ian emailed me that picture, knowing I love all things skull and nail art.  I screamed and decided to give it a go, enlisting my favourite hand model Grant and his nice big neat fingernails.

IMG_2561

I started off painting the ‘ribs’ hand black with Barry M Nail Paint in Black.  For the hand with the skulls, I painted a big white spot with my white nail striper from www.sparkly-nails.co.uk, outlined with my black nail striper.  Grant commented that this was a bit of a 60s/mod kind of look, and I agree – in fact it reminded me of these nails from MAC’s Glamour Daze collection (late 2012)….

mac glamour daze

…which I tried to recreate on myself a few months ago, long before I owned nail stripers, I was painting the black on with a regular (ie, too thick) nail polish brush so it was impossible to get the thin lines I was after.  So I improvised and only did three sides of each nail, I thought they looked pretty funky and graphic.  I like the combination of candy pink and black.

532255_4479951010271_1287276337_n

And here are those nails in action, just for fun.

DSC04111

Anyway, back to the skulls.  They then transformed into panda feet and something kinda Aztec, when I painted the teeth on with my white nail striper.

IMG_2564 IMG_2565

Before finally becoming what I think is a decent copy of the photo up the top of this post!

IMG_2566

In the original picture she’s got nail stickers on her thumbs; here’s me with two different types of Nail Rock stickers on my pinky and ring fingers (for some reason they WILL NOT stay on my middle and index fingers on either hand). 

  200012_4242288388854_1968200531_n 

So what do you think?  Do you find fiddly nail art easy or does it take you FOREVER (like me!)?

skull nails

IMG_2566

Thanks to Instagram Queen Carissa for the snaps of my nails!

nailed it: grey on grey skulls

28 Jan

Image

Sally Hansen Miracle Cure nail strengthening basecoat – I f_ck with my nails a lot and this stuff keeps them going.

2True Fast Dry Colour Quick Nail Polish in Shade 13 – cheap cheap, from Superdrug.

Nail stickers also from Superdrug, also cheap cheap.

Sally Hansen Insta-Dri anti-chip top coat.

It’s been on my nails for about 4 days now and there isn’t a single chip – this is almost unheard of for me, my nails usually don’t last more than 24 hours before they start to show serious signs of wear.  The grey is an unusual choice and a lot of people have commented on it.

Just goes to show that you don’t need to spend a fortune.  British high street is amazing for cheap, good quality makeup.  Which is how I justify buying so much of it 🙂

have you lost weight?

18 Jan

I like skeletons.  I have skull-motif everything.  If it comes in a bones version, I’ll take that one.  It’s no surprise, then, that one of my first major Halloween face-paint undertakings was skull makeup.

First I hit Google images for some guidance; quite often I’ve got no clue how to actually execute these brilliant ideas of mine.  I’ll admit it… I’m very ‘inspired by’.  Luckily, there’s the internet, just brimming with ideas to be pinched, mixed together and re-done.  There are some fantastic ideas out there… check out this and this and this!

So after a LOT of research, I pinched ideas from basically all of them and got busy.  I really liked the idea of vertebrae painted on the neck, and I wanted the teeth to be the main detail/feature.  Alewyn lent me his face to practice on:

alewyn

…which I was pretty happy with.  Not bad for a first attempt.  Here’s my second attempt, on myself:

skull mirror

… and in negative, X-ray style.

skull portrait

I actually like Alewyn’s better.  No one recognised me, which was my secret goal, so still a good effort.  Here’s what I used to do it:

  • basic black and white cream makeup (you can see the black tube in the top left-hand photo of the pictures of Alewyn.  It comes in every colour of the rainbow – plus an odd range of baby-shit browns and mustards – and you can buy it on eBay for a couple of bucks.  With the exception of the blue one, which flakes like f_ck, this makeup is pretty good.  Cheap, opaque, wears well without smudging/travelling, easily washes off.)
  • MAC Paint Pot in Blackground around the eyes, as I didn’t trust the cream makeup not to crease;
  • black and brown eyeliner to outline the teeth, and matte eyeshadows in medium brown, orange and yellow to discolour them (the brilliant white of the cream makeup was making my own choppers look rather beige in comparison.  Action had to be taken); and
  • yes of course I’m wearing mascara.

Oooh, now I’m inspired to do another skull-face again soon.  These photos are from Halloween 2009 I think… so it’s long overdue.  Next time I’ll be using my newly-acquired Illamasqua Skin Base Foundation (Shade: SB01) which gives a good translucent ghost-pale.  Set with universal/colourless finishing powder so black and grey powder can be used to create hollows and shadows, make it a bit more 3D.

Since we’re here, here’s Agi and Paul, both with a quarter-face skull done by me for Halloween 2010.  Looking at this photo now I am going to guess (cos I can’t remember) that the black in the eye sockets and on the nose is MAC Paint Pot in Blackground, and the white is Snazaroo Clown White.  By the by, Clown White is more comfortable to wear and doesn’t flake as much as cream makeup, and you can build it up as you want it (you can see it extends down to the jawline on Agi, and is much more opaque from the teeth up where I’ve put on additional layers).  So for whitening up a bigger surface, I’d recommend it over cream makeup, even though it’s probably not as opaque even when it’s on nice and thick.  It’s just less likely to become dry/uncomfortable, and crack up.  Anyway, here they are:

DSC00905

… and from Halloween 2012, here’s my friend Joy looking amazing as a sugar-skull.  It wasn’t me that did the makeup, but I love her look; the cherry-red hair and white contacts, wow –

joy

So there you have it, boys and girls.  Skeletal fun.  Stay tuned for further adventures in the underworld, this is one of my favourite faces to do so it won’t be the last you see here 🙂

%d bloggers like this: